
Prepare an API Key
Whatever tool you use - Codex, Claude Code, OpenCode or GitHub Copilot CLI - the first step is the same: obtain an API key from your service source and record the service address.
This page describes the portable preparation process. Official APIs, self-hosted compatible gateways and third-party compatible services may use different consoles, authentication methods and key formats. Account signup, key issuance, quotas and billing are handled by your service provider.
1. Create a key for your service source
| Service source | Common approach | If there is no console |
|---|---|---|
| Official API | Sign in to the official platform and create a credential on its API keys page | Follow the official platform documentation; account verification or payment may be required first |
| Self-hosted compatible gateway | An administrator creates the key, or you create one in the management console according to the deployment docs | Ask the gateway administrator for the key and address |
| Third-party compatible service | Sign in to the provider console and create a key on its API keys or tokens page | Contact the provider and follow its documentation to obtain the key and address |
The steps below use a common "provider offers an API key console" flow as an example. If your service has no such page, do not force these screenshot-based steps; follow your provider documentation instead.
2. Open the tokens page
Sign in to your service console and open the API Keys or Tokens page, then click the create button.
Different services may label it Create API Key, New Token or something similar.
3. Fill in the form
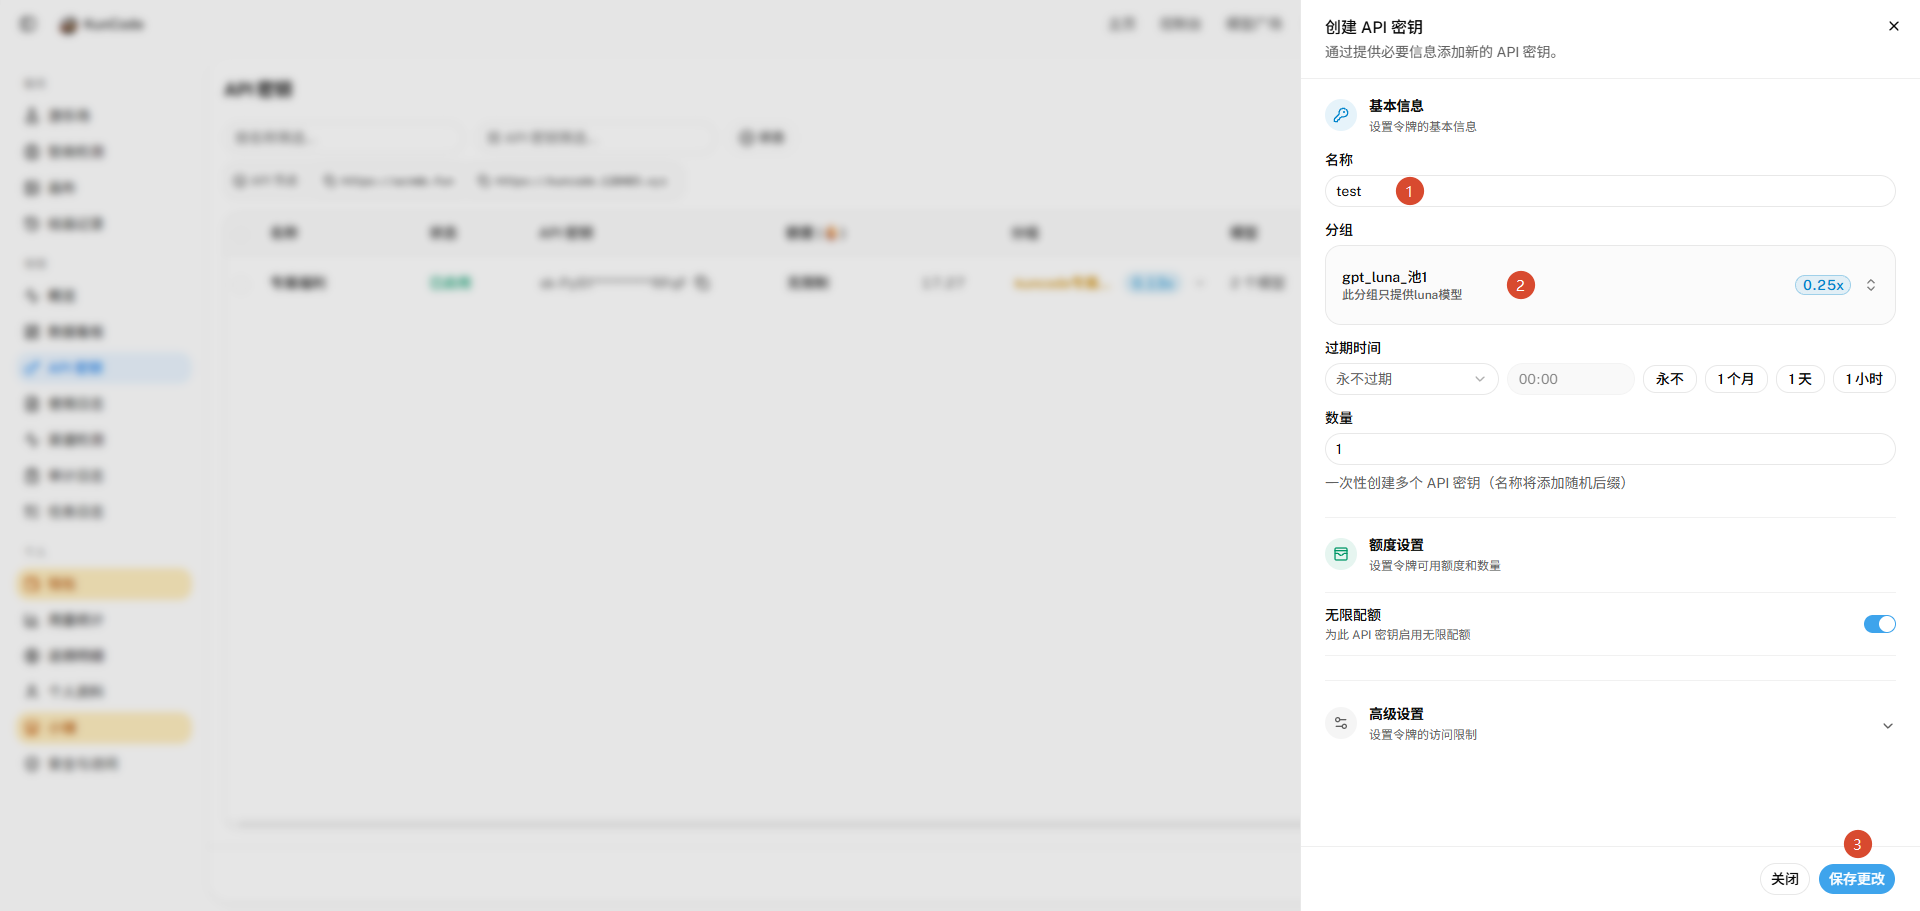
Field names and counts vary by service. These are fields commonly seen in compatible-gateway consoles. If a field is missing, follow the provider documentation.
| Field | Meaning | Recommendation |
|---|---|---|
| Name | A label only you see | Name it by purpose, e.g. codex-local |
| Group | Chooses the upstream channel and rate | Use the default if unsure |
| Expiry | The key stops working after this time; the time zone and allowed range depend on the provider | Pick "never" or set a validity period as needed |
| Count | How many keys to create at once | Usually 1; if creating several, confirm whether each key has an independent policy |
| Unlimited quota | Whether to cap this key's spend | On follows your account balance; off lets you set a cap |
Create one key per tool
Give Codex, Claude Code, OpenCode and GitHub Copilot CLI separate keys. Billing, debugging and revocation all get easier. Sharing one key is possible, but you cannot tell who used it.
When the form is complete, use the save or create button on the page.
4. Copy the key and note the service address
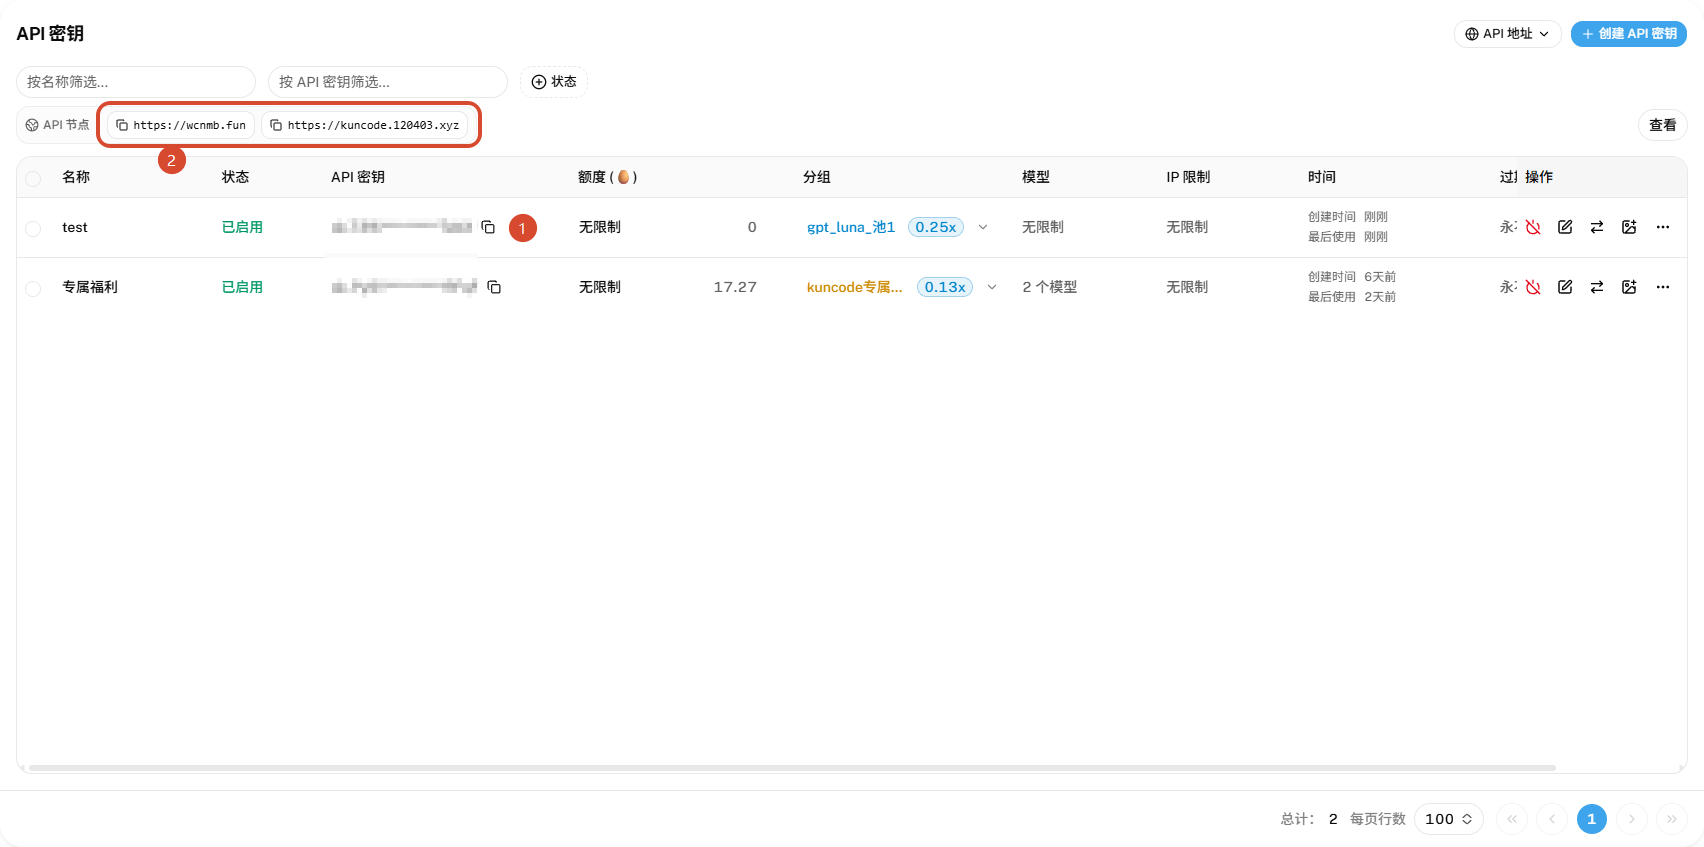
After creation, you usually need to record two things.
1. Save the full key
If the console only shows the full key at creation time, copy it immediately into a password manager. If the list still provides a copy button, save it immediately anyway; do not assume it will remain visible.
Key display policies differ:
- Some services show the full key only once; after the dialog closes it cannot be viewed again
- Some services allow copying the full key from the list
- Some services show only a prefix or masked value, so a new key must be created to get a new secret
If the key is lost and cannot be copied again, follow the provider documentation to delete or revoke the old key and create a new one.
2. Note the API endpoint
If the console shows an API endpoint or similar field, it is usually the root address of the service, for example https://kuncode.120403.xyz.
This guide calls it the service root address. A console may label it API endpoint, Base URL, API address or Endpoint.
Do not assume every tool needs the root address
Tools handle Base URLs differently: some expect the root address and some expect a path ending in /v1. Use the tool setup page and the Base URL guidance in Choose an endpoint. Do not decide only from the console label on this page.
A service root address usually does not need a trailing slash. What the tool itself expects still comes from its setup page.
5. Verify the key works
Before configuring any tool, confirm the key itself works. The following is an OpenAI-compatible example:
curl https://your-gateway.example.com/v1/models \
  -H "Authorization: Bearer sk-xxxxxxxx"
Replace the address and key with your own. A model list usually means the key and address are basically working. Authentication headers may differ for other protocol endpoints; follow the provider and tool documentation. See Models and capabilities for choosing a model.
| Response | Meaning | Next step |
|---|---|---|
| Model list | Key works | Continue to Choose an endpoint |
401 Unauthorized | Wrong, expired or disabled key | Check the copy and the expiry |
| Out of quota | Account or key quota too low | Top up or raise the quota according to the provider documentation |
Key lifecycle FAQ
Can an expired key be renewed?
It depends on the provider. Some consoles let you edit the expiry or renew a key; others require deleting it and creating a new one. The time zone, allowed range and effective time also depend on the provider. Follow the console and provider documentation.
If I create several keys at once, are their quotas independent?
It depends on the provider implementation. Commonly each key has its own quota, permissions and expiry, and deleting or revoking one does not affect the others. Some services may bind keys created in one batch to the same policy. Check the console description first, then test each key after creation.
What should I do if a key leaks?
Follow this order:
- Revoke immediately: delete or disable the leaked key in the provider console
- Create a replacement: apply least privilege with model limits, quota, expiry and IP allowlists
- Update clients: replace the key in local configs, environment variables and CI secrets, then verify the new key works
- Check logs: review provider usage, request logs and billing for suspicious activity
- Clean the leak source: remove the plaintext key from Git, chats, screenshots, logs and shell history
The exact actions and available controls depend on the provider console.
Next
To understand API keys, groups and ratios first, read Concepts.
Once the key and address are ready, continue with your tool:
Optional: narrow the permissions
If the provider supports it, expand advanced settings when creating the token:
- Model limits - restrict this key to specific models
- IP allowlist - restrict this key to specific IPs or CIDR ranges
Both are optional. Skip them for personal local use; enable them for teams or CI. Field names, formats and supported ranges depend on the provider console.