
Codex
Tested with
Last verified: 2026-10-06 · Codex CLI 0.160.0
OpenAI's official CLI. With a custom provider you can point Codex at any compatible gateway.
This page uses KunCode as an example. Replace the addresses, keys and model names with your own service's values. See placeholder conventions.
1. Install
npm install -g @openai/codexbrew install codexCheck the install:
codex --versionAny version string works, e.g. codex-cli 0.144.6.
2. Prepare an API key
See Prepare an API key. Note two things:
- API key - usually looks like
sk-...; use whatever format your provider issues - API endpoint - your service address, e.g.
https://kuncode.120403.xyz
3. Find the config file
Codex reads its config from .codex/config.toml in your home directory:
| OS | Path |
|---|---|
| macOS / Linux | ~/.codex/config.toml |
| Windows | %USERPROFILE%\.codex\config.toml |
On Windows you can paste %USERPROFILE%\.codex into the File Explorer address bar:
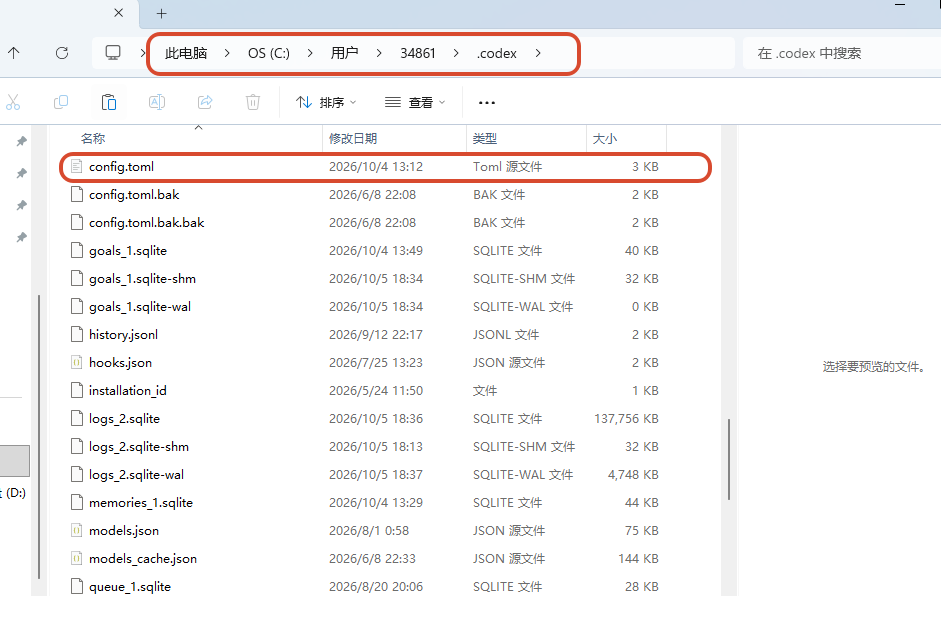
Create a config.toml if it does not exist yet.
4. Fill in the config
Open config.toml in an editor and write:
model_provider = "custom"
model = "deepseek-flash"
model_reasoning_effort = "xhigh"

[model_providers.custom]
name = "KunCode"
base_url = "https://kuncode.120403.xyz/v1"
wire_api = "responses"
requires_openai_auth = true
experimental_bearer_token = "sk-xxxxxxxx"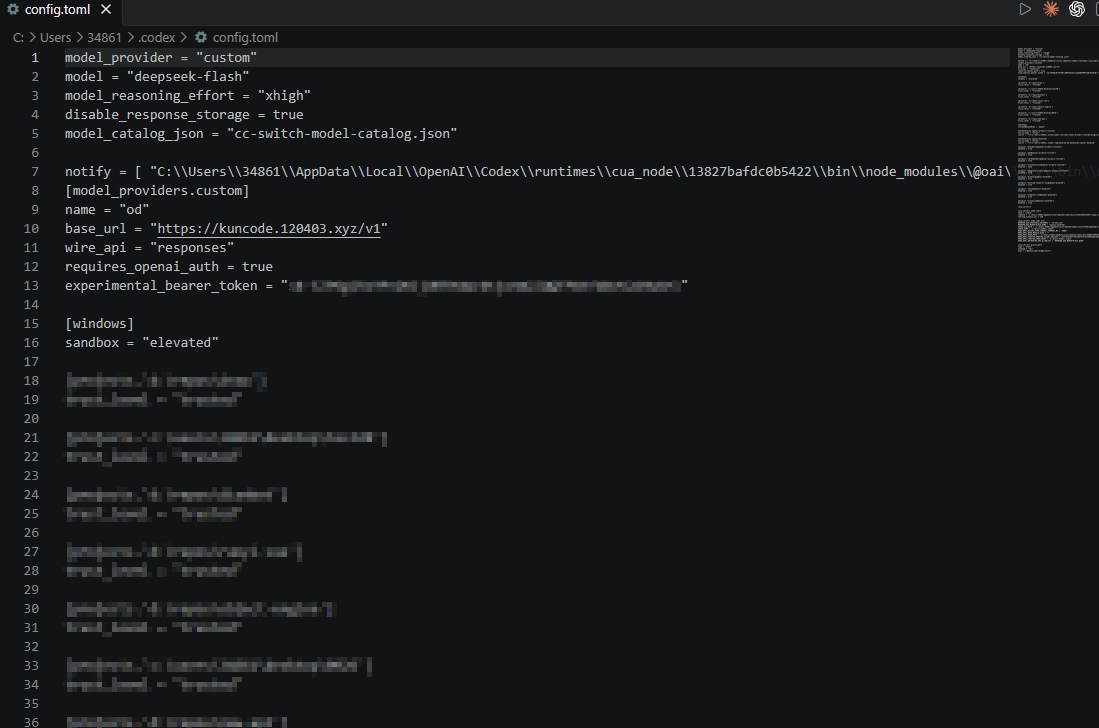
Only a few values need changing:
| Field | Meaning |
|---|---|
model | The model to use; must exist on the service |
base_url | Your API endpoint plus /v1 |
experimental_bearer_token | Replace with your own API key |
name | Display name for the provider; anything you like |
base_url must end with /v1
Write base_url as https://kuncode.120403.xyz/v1.
Codex appends /responses itself, so do not write /v1/responses.
The key is stored in plain text
This approach keeps the key in config.toml as plain text. So:
- Never commit
config.tomlto Git - Mask the key before sharing a screenshot
Prefer environment variables? Use the env_key field instead (see Advanced below).
The extra lines in the screenshot
disable_response_storage and model_catalog_json in the screenshot are added by the CC Switch import. You do not need them for a manual setup.
5. Verify
From any directory:
codex exec "print hello"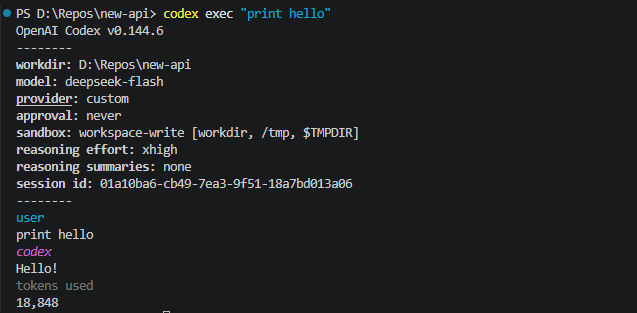
A normal reply means the setup works. The output also echoes the active model, provider and reasoning effort, which is handy for confirming the config took effect.
6. Common settings
Switch models
Change the model field:
model = "gpt-5"List the available models with:
curl https://kuncode.120403.xyz/v1/models \
  -H "Authorization: Bearer sk-xxxxxxxx"
Adjust reasoning effort
model_reasoning_effort controls how hard the model thinks:
| Value | Meaning |
|---|---|
minimal | Least thinking, fastest |
low | Low |
medium | Medium |
high | High |
xhigh | Highest |
model_reasoning_effort = "xhigh"Not every model supports it
Only reasoning models honour this field. Others ignore it.
7. Troubleshooting
For a systematic walkthrough by status code, see Errors and troubleshooting.
| Symptom | Cause | Fix |
|---|---|---|
401 Unauthorized | Key missing or wrong | Check experimental_bearer_token holds the full key |
404 Not Found | Wrong base_url | Must end with /v1 and support the Responses API |
| Unknown model | Model not available | Use a model from /v1/models |
| Connection timeout | Network or proxy | Check DNS, proxy and firewall |
| Config ignored | Wrong file path | Must be ~/.codex/config.toml, not codex.toml |
Advanced: keep the key in an environment variable
To avoid storing the key in the config file:
[model_providers.custom]
name = "KunCode"
base_url = "https://kuncode.120403.xyz/v1"
wire_api = "responses"
env_key = "KUNCODE_API_KEY"
Then set the variable:
export KUNCODE_API_KEY="sk-xxxxxxxx"$env:KUNCODE_API_KEY = "sk-xxxxxxxx"To persist it, add the export to ~/.zshrc or ~/.bashrc, or set a system environment variable on Windows.
Advanced: import with CC Switch
If you already use CC Switch to manage providers, skip the manual config:
- Open the service's API Keys page and find your token
- Click Import to CC Switch
- Choose the Codex app and pick a model
- Click Open CC Switch; the config is written for you
The result is the same as the manual setup above, just without the typing.
Advanced: Codex++ desktop enhancements (third party)
Unofficial tool - audit the source first
Codex++ is not an OpenAI product and is not a standalone AI coding client. It targets Codex Desktop by modifying or injecting into the desktop app, running local scripts and installing update watchers to extend the UI, accounts and provider configuration. Install only from a repository with auditable source; avoid builds with no source or an unknown publisher.
Codex++ project details checked: 2026-10-07. The official OpenAI documentation does not document a supported injection API for Codex Desktop. For KunCode, prefer the Codex CLI config.toml setup above. Consider Codex++ only if you specifically need a translated desktop UI, account switching or graphical provider management.
Back up before installing
- Quit Codex Desktop.
- Back up
~/.codex/config.tomland~/.codex/auth.json; on Windows these are%USERPROFILE%\.codex\config.tomland%USERPROFILE%\.codex\auth.json. - Record the current Codex Desktop version, provider and model settings.
- Keep the backup until the desktop app and the new provider both work.
The xianyu110/CodexPlusPlus docs say its "clear API mode" switches back to the official login state; the original Codex++ documents codexplusplus safe-mode, repair and uninstall. Do not rely on those commands as your only backup. Back up the config and auth files yourself.
CLI success does not guarantee desktop success
The codex exec check above verifies Codex CLI. Whether Codex Desktop reads the same ~/.codex/config.toml, and whether Codex++ rewrites it, depends on the desktop version and the implementation. After setup, send a message from the desktop app and confirm that the request actually uses the intended provider.
Projects to investigate:
| Project | Platform / status | Notes |
|---|---|---|
| xianyu110/CodexPlusPlus | Windows / macOS, active | Uses an external launcher and CDP injection; claims not to modify app.asar. Its relay-injection mode writes a custom provider into ~/.codex/config.toml. |
| b-nnett/codex-plusplus | Original project, archived | Early tweak system that patches app.asar; last code update was 2026-06-08. Not recommended for new installs. |
Avoid untrusted release packages
Do not use untrusted packages that advertise "skip official login" or "unlock the plugin marketplace." Those features may violate terms, expose account credentials or break Codex updates. Never commit an API key to Git, paste it into an issue, or hand it to an unaudited third-party script.
Found an error or outdated content?
These docs track tool releases. Please open an issue, or use "Edit this page on GitHub" in the footer to submit a fix.